Kids’ Cakes


I’ve never been that excited at the prospect of making kids’ cakes…
But that’s mostly because I never thought I could make anything remotely resembling what any kid would expect after requesting a Batman cake… or a Buzz Lightyear cake, or Spiderman, or Ben 10…
Well, although my Spiderman Cake did impress the 3 year old it was for, I was certainly far from pleased with my efforts. So when the next request came around and I was faced with making a Ben 10 cake I decided to take on the challenge with a fresh attitude, rather than going in expecting it not to work out.

Suffice it to say, I impressed myself more than anyone else with that one.
So after discovering that kids’ cakes weren’t nearly as difficult as they appeared to be, I was actually rather excited to take on the Batman and Buzz Lightyear challenges.
I think the boys were as pleased as I was with how they turned out in the end.


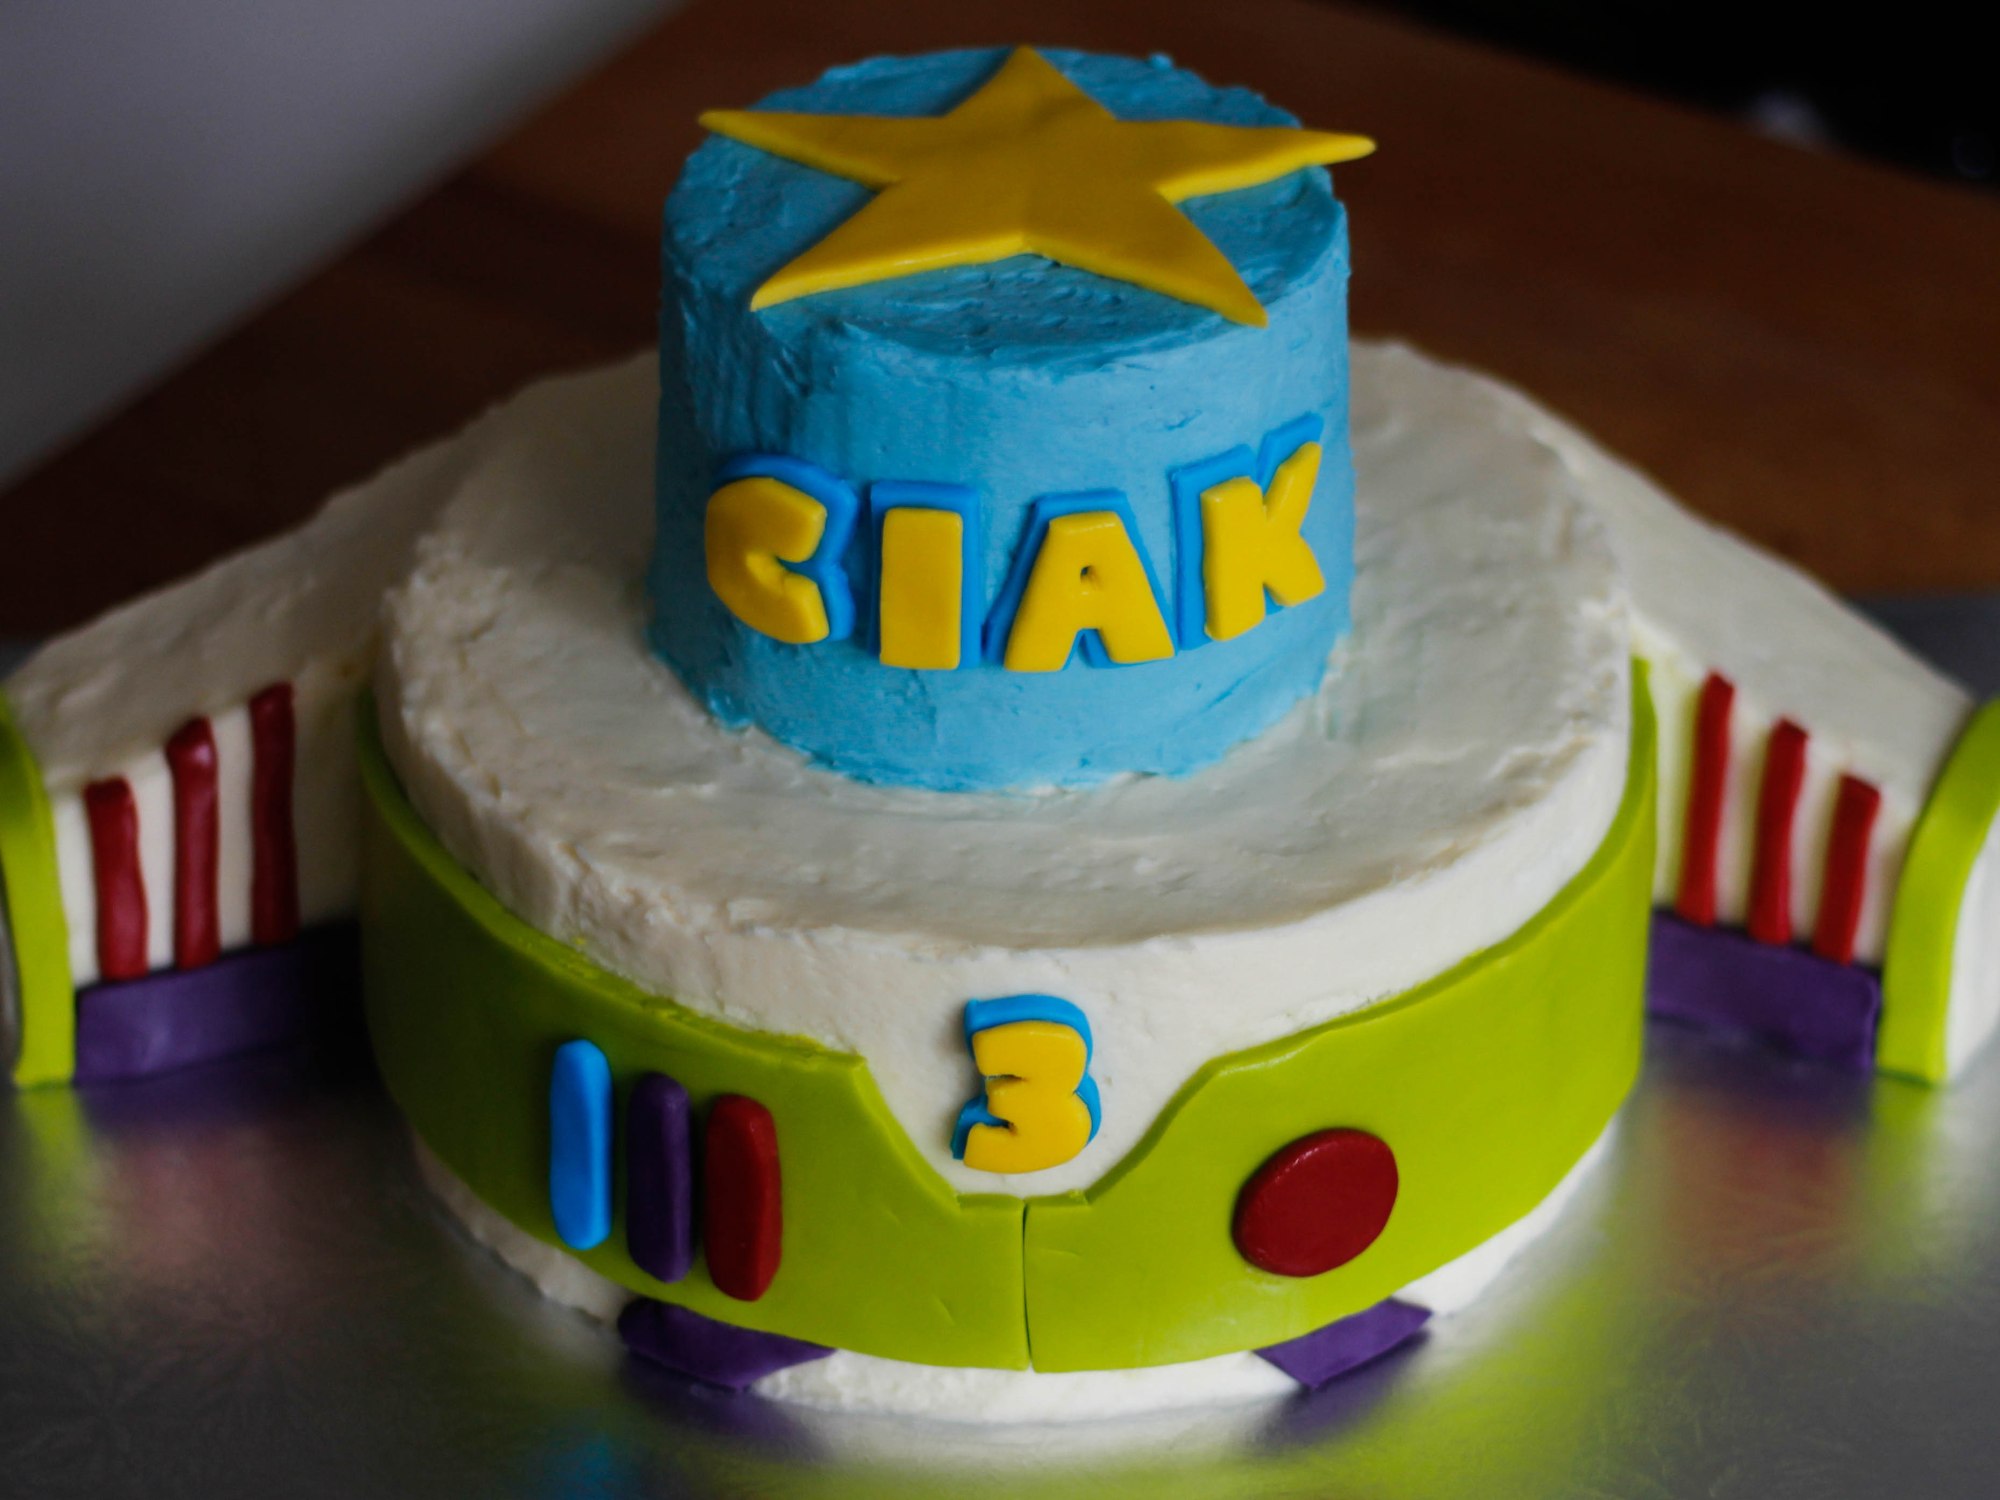
I have included the recipe for the Buzz Lightyear cake below, however please be aware that the quantities are not exact. The recipes are accurate, but the yield may be more or less than stated… I had off cuts and left overs, so you should end up with more rather than less.
For the Batman cake you could probably get away with one and a third batches of the below recipe. For this cake you would need to make three 8″ layers and one tall 6″ cake that you can cut into an oval for the batman logo.

In terms of timing, you will need at least a full day to complete a cake like this. The best way is to make the cakes two days before, allow them to cool and then wrap them tightly in cling film. Make the buttercream the next day, then build the cake up to the final buttercream layer. The morning of (or the evening before if there isn’t time in the morning) add the fondant decorations.
Buzz Lightyear Birthday Cake

Ingredients
For the cake
Note: 2 batches of the recipe below made 1 Buzz Lightyear cake and 10 alien cupcakes
Yield (batch 1): three 8″ cakes (380g each)
Yield (batch 2): one 8″ cake (380g), three 4″ cakes (120g each), 10 cupcakes (40g each)
180g butter
225g caster sugar
3 eggs
225g plain flour
10g baking powder
6g baking soda
1/2 tsp salt
20g cocoa powder
300ml milk
100g dark chocolate
75g milk chocolate
100g creamed coconut
100ml boiling water
For the filling
100g dark chocolate
25g milk chocolate
500ml double cream
50g icing sugar
150g cream cheese
For the buttercream
Note: make 2 batches of the buttercream recipe below. You can do it all in one, but I prefer to do it in two.
40g flour
240ml milk
250g butter
235g sugar
For the decorations
Ready to roll fondant icing: green, yellow, red, blue, purple, black
Method
For the cake
Preheat oven to 180°C/350° F/Gas Mark 4.
Break up the dark and milk chocolate and place in a bowl along with the creamed coconut. Heat the milk just until it starts to bubble, then pour the hot milk over the chocolate and coconut cream. Add the boiling water and leave aside to melt.
Sift together the plain flour, baking soda, baking powder, cocoa powder and salt, stir to combine and set aside.
Stir the milk and chocolate mixture until smooth. If there are still lumps but the mixture is cool, heat it in the microwave for around 20 seconds and stir again. Repeat until the chocolate and coconut have dissolved.
Cream the butter and sugar, then add the eggs one at a time and beat until light and fluffy.
Add the flour mixture to the creamed mixture one third at a time, alternating with the melted chocolate and milk mixture and beating after each addition.
Approximate baking times
8″ cakes: 35 – 40 minutes
4″ cakes: 20 – 25 minutes
cupcakes: 15 – 20 minutes
(test cakes with a cake skewer before removing them from the oven)
For the filling
Melt the chocolate and set aside to cool.
Whisk the cream until it starts to thicken, then sift in the icing sugar and continue to whisk until soft peaks start to form. Whisk in the cooled melted chocolate and set aside.
Beat the cream cheese in a separate bowl until smooth, then gently fold the two mixtures together.
For the buttercream
Whisk the flour and milk together in a saucepan, making sure there are no lumps, then set over a low heat, stirring constantly until the mixture has thickened. Remove from the heat, cover with cling film and set aside to cool.
Beat the butter and sugar together until light and creamy, then add the flour mixture and continue to beat until the mixture has paled to a creamy white and all of the sugar has dissolved.
Assembling the cake
Once the cakes are completely cool level the top of each layer with a cake cutting wire. Place the first 8″ cake layer onto a cake board or cake stand and cover with a layer of the chocolate cream filling and smooth the filling with a palette knife.

Place the next 8″ cake layer on top of the chocolate cream filling, then smooth another layer of chocolate cream on top and place the third 8″ cake layer on top of that.


Measure the height of the cake, then take a piece of baking paper and make a wing stencil in the shape of the image below. The longer side should be the same height as the cake.

Take the final 8″ cake layer and, using the stencil, cut out two wing shapes. Prop the wings up beside the cake and trim the sides at a diagonal so that the wings fit snugly against the sides of the cake.
Use some of the buttercream to stick the wings to the side of the cake, then crumb coat the entire thing. Place one of the 4″ cakes on top and cover with some of the chocolate cream, then repeat until you have three layers.
Tip: if you can get your hands on a 4″ cake board then you can crumb coat and ice the top tier of the cake separately and place it on top of the bottom tier afterwards. If you don’t have a 4″ cake board, as I didn’t, this method worked out fine for me!


Crumb coat the top tier of the cake, then place the whole cake in the fridge for at least 20 minutes.

Take the cake out of the fridge and cover the bottom tier and wings with a thick layer of the buttercream. Take about a cup of the remaining buttercream and add some blue food dye, then use this to frost the top tier of the cake.

Use a rolling pin to roll the fondant icing out smooth and flat, then cut out the shapes and decorate as you please.

Take a further 1.5 – 2 cups of buttercream and colour with green food dye. Use the green buttercream to ice your cupcakes, smoothing the tops so that you’re left with a flat surface. Pipe three small dots of white buttercream to make the eyes, then use the fondant to complete the aliens.


Enjoy… x

This is the perfect cake to make for kid’s birthdays!
LikeLike
Thank you! The kids were pretty happy with them 🙂
LikeLike